31 July 2012

Mascarpone and Cherry Chocolate Layer Cake

Lately cherries are becoming one of my favorites fruits, you can check here or here, and of course now it is cherry season. But this is not just because of its lovely taste also for its beautiful look. I found these cherries in the organic corner of the market, they are hudge, I love the color they have and they taste amazing, also the price was surprising... well in Holland fruit is often more expensive.


I adapted the cake recipe from Nigella Lawson.

INGREDIENTS FOR THE CAKE makes a high 15 cm tin

160 g plain flour
160 g sugar caster
145 g unsalted butter soft and cubed
2 largge eggs
125 ml sour cream
1 teaspoon baking powder
1/2 teaspoon bicarbonate of soda
1/2 teaspoon vanilla extract
30 g cocoa powder

Preheat the oven to 180º and prepare the tin with butter.

Sift the flour, bicarbonate of soda, baking powder and cocoa.

Mix together the butter, the sugar and the vanilla. Add the eggs one by one, continue to mix, add the sour cream and finally the sifted ingredients, and beat until mixture smooth and all ingredients are well combined.

Pour the mixture in prepared tin and bake for 40 minutes or until a thin skewer comes out clean.

Leave the cake in the tin for 5 minutes, and after let it cool completly on a wire rack. For better results cover with plastic film and store in the fridge, for few hours or ven the day after it will be easier to work with.

FILLING
250 g mascarpone cheese
150 ml heavy cream
60 g icing sugar
1/4 teaspoon vanilla extract
400 g cherries
cherry jam

Wash and pit the cherries, leave some of them for topping the cake.

Mix mascarpone, sugar and vanilla until smooth. In a separate bowl whisk heavy cream until you can make peaks and mix it gently with the mascarpone mixture. Place the mixture in the refigerator.

In the meantime cute the cake in layers and spread the jam, put some cherries and cover with the mascarpone, repeat the process and top with some cherries.


Raquel

---  ---

28 July 2012

Banana Coffee Milkshake

Milkshakes are perfect for any season of the year, but specially during hot summer days is extra good. The one I show you today I like it for breakfast but also good any time of the day. You will need to put a banana in the freezer in advance and make a nice extra strong coffee and let it cool down. And in less than 5 minutes you will enjoy a tasty and refreshing milkshake.


INGREDIENTS  makes 2 milkshakes

1 ripe banana
6 scoops of vanilla ice cream
1 large coffee
cocoa powder for decorating

Peal and cut the banana and store it in the freezer, you can do it at least with 20 minutes in advance.  Make a coffee, let it cool down and place it in the freezer or in the fridge to make it quicker. Put all ingredients in  the blender and serve inmediatly. You can decorate with some cocoa powder.

Enjoy it!!


24 July 2012

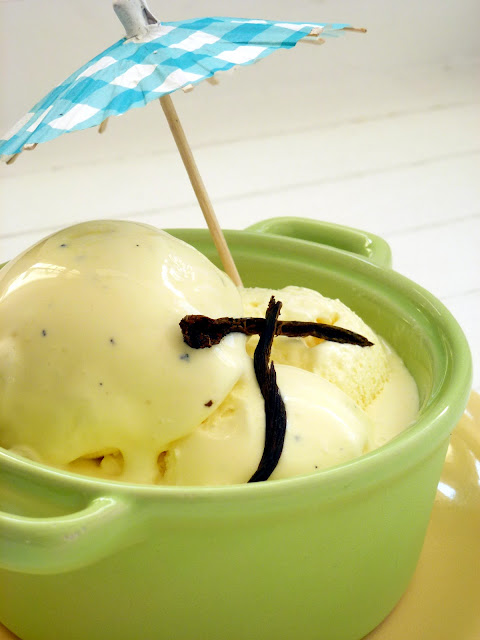
Vanilla Ice Cream

This is probably the most common ice cream, and the less flamboyant when you visit a lovely italian ice cream shop and you can not make a desicion because of the many amazing flavours they have. But the vanilla ice cream is the essential to join any cake, milkshake, brownies... and of course also alone.


Let's go to make an easy and creamy ice cream, which does not require an ice cream maker.

INGREDIENTS

500 ml heavy cream
250 ml whole milk
4 eggs yolks
130 g caster sugar
2 vanilla bean
1/2 teaspoon pure vanilla extract

Split vanilla pods lengthwise and scrape out all the seeds.

Place the vanilla seeds, pods and milk in a sauce pan and heat, remove from the heating juste before starting the bubbles at the edges and let it cool down.

Combine eggs yolks and sugar with an electric mixer until thick and pale yellow.

In a separate bowl whisk heavy cream until you can make peaks.

Remove vanilla pods from the milk and add graduatly eggs yolks and sugar mixture and beat until well combined and smooth. Finally add vanilla extract. 

Pour the mixtue into a freezer-proof container and refrigerate it for 45 minutes, after this period remove from the freezer and mix it well to prevent crystallizing. Repeat this process two times more. At the last process you can mix also with an electric mixer.

If you have an ice cream maker just follow the instructions of the manufacturer.

After 3 hours you could enjoy a creamy ice cream. 


Notes: Egg yolks amount can be changed to your liking, but is very important to use good quality eggs, also the color will be more nicer. Used vanilla pods can be rinsed and dried, and stored in a sugar jar.


20 July 2012

Pistachio Chocolate Chip Cupcakes

This is an original recipe from Making Cupcakes with Lola's book, the only change I did is use 70% chocolate, instead of milk chocolate chips. I prefer much better puur chocolate. 

After my last trip to London and tasted their fresh cupcakes I knew I had to buy this fantastic book, full of goluptious recipes, even with some vegans and gluten-free recipes. Everytime I open the book is quite difficult to decide which flavour to make, but this time was easy, I had unsaltened pistachios and chocolate is always in my pantry.


Lola's is known for its amazing cupcakes and also its lovley cakes, unfortunatlly not included in its book. There are some stores around London, even in Harrods and Top Shop, I love to find out cupcakes in other places such as these, definitely cupcakes are a fashion icon! 

INGREDIENTS makes 12

115 g all purpose flour
1 tsp baking powder
a pinch of salt
100 g butter cubed and soft
170 g caster sugar
1/2 tsp vanilla extract
2 eggs
40 ml light cream
110 g shelled unsalted pistachios
75 g chocolate chips

Preheat the oven to 180º and prepare the cupcake cases in the trail.

Stir together the flour, baking powder and salt in a bowl.

Put the butter, sugar and vanilla in a mixing bowl and beat until pale and fluffy. Add the eggs, one at a time, beating well after each addition.

Add the sifted dry ingredients and cream in alternate batches and beat on low speed until combined. Fold in the ground pistachios and chocolate chips.

Divide the mixture between the cupcake cases and bake 25 minutes or until well risen and a skewer inserted in the middle comes out clean. Remove from the oven and let 5 minutes in the trail and let it cool after in a wire racke before decorating.


Chocolate Mousse Frosting

125 ml heavy cream
125 g chocolate finely chopped
125 g butter, cubed and soft
400 g icing sugar
1 tbs cocoa powder
finely chopped pistachios to decorate

Put the cream in a sauce pan over medium heat and heat until just strating to bubble around the edges.

Remove from the heat and stir in the chocolate. Stir until the chocolate has melted and ganache is glossy. Let it cool in room temperature.

When ganache is in room temperature, put the butter ina mixing bowl. Beat with an electric han mixer until light and fluffy. Add the sugar, cocoa and ganache and beat on slow speed until combined, increase the speed to medium and beat for 3 minutes, or until light. Refrigerate for 30 minutes, or until firm enough to pipe.

Spread the frosting over the cupcakes and top with chopped pistachios.


This is an easy and delicious chocolate ganache also available to fill and cover cakes. The amount is more than enough to decorate 12 cupcakes, so you can divide the ingredients in 3/4 or you will have enough ganache to cover a huge cucpakes or do just like me, I've  finished it with an spoon!

XXX

Raquel

14 July 2012

Cherry Clafoutis

Cherry Clafoutis is a delicious traditional french dessert and taking the advantage that now it is the season for cherries so lets make this nice and easy dessert.
Traditionally was made without pitting the cherries, but personally I prefer to pit them. Pitting the cherries is always a tedious job but this task is much easier if you have a cherry pitter, but you can also use a knife or even a plastic pen or a little funnel, pressing from the bottom the pit goes out quite quick, but carefully otherwise your kitchen or your apron will get red splashed.


INGREDIENTS  makes 8 little tins or one 24cm tin

100 g sugar 
100 g all prurpose flour
50 g almond flour (optional)
200 ml heavy cream
50 ml whole fat milk
50 gr unsalted butter in room temperature
4 large eggs
1/2 tsp vanilla extract
pinch of salt
250 g fresh chrerries


Preheat the oven to 180º, place the rack in the middle.

Wash and pit the cherries.

Using a electric hand whisk mix together the butter and the sugar, add the eggs one by one, continue to mix, add milk and heavy cream, and finally add the flour, salt and almond flour. Beat until mixtue smooth and all ingredients are well combined.

Prepare the tins with butter.

Place cherries in the bottom of tins, add the mixture and top with some more cherries. You can top until half cm, even in the oven it grows a lot, after it turns to the same level.

Bake for 20 minutes, or 30 if you use a big tin, until they are golden brown or skewer inserted in the middle comes out clean. Do not open the oven until the end of baking time or it may collapse.


Serve immediately with a dusting powder sugar, posible to eat warm or cold. In my case I prefer it cold.

It is very easy to take it out of the tin, but much nicer to serve them in the tin.

Traditionally the almond flour is not in the recipe, but I included because gives a little bit an other taste, both are nice.

Does it not sound great to say you prepared Cherry Clafoutis for dessert? in France things sounds much better!

Bon appétit!

XXX

Raquel

09 July 2012

Strawberry and Cream Tartlets

I love tartlets, they look so cute, even with the required time they need I think is easy to make them. The advantage is you can make enough dough and put it the freezer up to 3 months, so it will be easier when you decide to make them.


My lovely little garden delights with juicy and fresh strawberries, unfortunatly not enough to make these tartlets but to enjoy as a nice snack or use some of them to make this tempting dessert. So I have no other choice then to go to a fruit shop, but anyway they look goergous and taste delicious.

These tartalets are filled with pastry cream on a crust of paté sablee. With the following ingredients you can make 4 tartlets of 8cm or a 24cm one.


Patê Sablée {recipe of Martha Stewart}
3/4 cup unsalted butter
1/2 cup sugar
1 1/2 cups flour
3/4 teaspoon salt

Beat butter and sugar with an electric mixer on a medium about 3 minutes. Reduce speed to medium-low. Add flour and salt, beat until just combined and crumbly. Shape dough into a disk, and warp in plastic. Refigerate 1 hour up to 2 days. Can also be freezed up to 3 months.

Vanilla Pastry Cream {recipe of Martha Stewart}
1 cup milk
1/2 tbs vanilla extract or vanilla bean
2 large egg yolks
50 g sugar
15 g cornstarch

Put the milk and vanilla in a saucepan until starts boiling. Remove from heat, cover and let stand for 20 minutes.

Whisk egg yolks until smooth and reserve.

Put sugar and cronstarch in a saucepan and add gradually the milk mixture and cook over medium heat, stirring constantly, until mixture thikens and begins to bubble, about 5 minutes.

Whisking constantly, slowly pour one-third of milk mixture into egg yolks. Pour mixture into remaining milk in saucepan. Cook over medium heat, whisking constantly, until mixture comes to a full boil and is thick enough.

Strain mixture through a fine sieve into a heatproof bowl. Cover with plastic wrap, pressing directly on surface. Refrigerate at least 2 hours or up to 2 days. Before using whisk to soften slightly.


Preparation of Tartlets:

Preheat the oven to 180º. On a floured surface, roll out dough and fill the tart pans. Trim and pierce bottoms with a fork. Refrigerate or freeze until firm, about 30 minutes.

Bake until edge are golden, about 15 minutes. Remove parchment and weights and continue baking until crusts are golden brown over, about 10 minutes. Let cool completely on a wire rack.

Fill tart shells halway with pastry cream and top with sliced strawberries. Serve immediatley or refrigerate up to 2 hours.


Before serving you can also sprinkle them with icing sugar, honey or syrup.

You would need about 250 grams of strawberries.


Enjoy!

XXX

Raquel

03 July 2012

Macaron Workshop

Last saturday I was lucky to attend a workshop in a patisserie in Amsterdam, Patisserie Tout. This is a well known patisserie for its macaroons as well as for its chocolate bonbons and other specialties.


That was my first experience with macarons, until then I just had eaten this little pretty delicatessen bought in shops or eaten in some events.


All they do is are really delicious, I tried 10 different flavors of macarons, I could not say which one was better, all of them were nice, even the less common flavors such as black truffle or tomato and basil.


I could not taste the chocolate bonbons, but they really looked gorgeous, and I do not think they would disappointed me, that means I have to go back!


Here is the only one picture I took of the 16 macarons I took home, I just can say they tasted amazing. Filled with chocolate ganache with touches of coconut and raspberry flavor.


I am looking forward to make macarons at home, I was expecting they were more difficult to make!

Raquel

---  ---

02 July 2012

Caramel Sauce

The caramel sauce goes perfectly with any dessert like an ice cream, yogurts, cakes, cupcakes or just eating it with a spoon!

The process is very easy and just takes about 15 minutes and we will have our homemade caramel sauce done.


Adapted form this blog.

INGREDIENTS
120 g butter
4 tablespoons water
100 g light brown sugar
100 g white sugar
200 ml heavy cream
1/2 teaspoon fleur de sel (optional)

Place sugar, the butter and water into a saucepan over medium low heat and stir the until sugar has dissolved, swirling the pan occasionally, for 3 minutes. The sauce will turn to amber, at this point add slowly the cream. You will see it will make a lot of bubbles, but this is normal. If you want to make your sauce salty add the salt after the cream.

Stir with a wooden spoon and remove from heat.

Placed in sterilized glass jars, let it cool on room temperature and store in refrigerator.


Once you make your own caramel sauce it will be quite hard to eat one form a store.